SHF#9 - Nyonya Pineapple Tarts
♥ Nyonya Pineapple Tart
When I first found out the theme of this month's Sugar High Friday - Tantalizing Titillating Tempting Tarts, what else could I have possible made but my favourite Nyonya Pineapple Tart!
If you have not already noticed my obsession with these tiny bite-size morsels, let me repeat once again - I am absolutely in love with Nyonya Pineapple Tart! *sorry, ShinChan*
♥ tabeshimashita @ pinkcocoa's kitchen on 17 june 2005
I have been dreaming about having good decent melt-in-your-mouth Nyonya Pineapple Tarts ever since Chinese New Year. It was after I finished my box of the golden tarts that I embarked on making the tarts using my own hands because my body simply wants more and more!
I have experimented with a couple of pastry recipe and finally found one that I quite like. My pastry recipe is actually a combination from Jo's recipe and that from Shiok! There are two methods of going around the pastry dough. First up, the rub-in method where you rub butter into flour. And second, the creaming method where you cream the butter and sugar together before adding in flour.
I have found the rub-in method produces a lighter and crunchier pastry, whereas the latter produces more of a creamier melt-in-your-mouth texture. Personally I prefer the pastry from the creaming method.
As with the pineapple jam (which is really quite a bit of work out), I used the method from Makan-lah! but had adjusted the sugar to taste, depending on whether fresh or canned pineapples are used. I used canned pineapple this time since I didn't manage to get fresh pineapples. If you can, please use fresh pineapple because the texture and flavour from that of a fresh fruit is so much more flavoursome than those from a can.
♥ Nyonya Pineapple Tarts
Pineapple Jam
2 large cans (880g) pineapple pieces in natural juice
1tsp cinnamon powder*
220g caster sugar, plus more if necessary**
- Drain pineapple from cans, reserving juice. Chop pineapple roughly and here comes a good arm toning exercise. With all your might and strength, take a handful of the pineapple pieces and squeeze out as hard as you can all the juice from the pineapple. Don't worry if it's not super dry. It's perfectly alright if the pineapple is still slightly damp.
- Combine chopped pineapple pieces, cinnamon powder and caster sugar in a large, wide pot (preferably non-stick. I used my non-stick skillet). Stir over medium heat until sugar dissolves. Taste, and adjust sugar as necessary. You can also add a bit of honey if you like.
- Keep stirring the mixture until it reduces to a thick, ambered coloured jam. If in the process of cooking, you found the mixture has dried up too quickly, add a tablespoonful of the reserved juices and proceed on cooking. If you prefer a more citric flavour especially when you are using canned pineapples, add some lemon or lime juice to give it a more zingy kick.
- Remove from stove and set aside to cool. Once cool, store jam in fridge in airtight container. Jam can be kept in the fridge for a long time in an airtight container.
note: make jam the day before making pastry
* Original recipe calls for 3 cinnamon sticks. You can also add in 1 whole star anise, broken into pieces; and cloves, if you like. I didn't include them since I don't like the taste.
** Do adjust the sugar to your taste. I think the original recipe calls for around 400g caster sugar! I think it's a tad too sweet for me.
Pastry
45g milk powder*
15g custard powder*
65g corn flour*
275g plain flour*
2/3tsp salt
2tbsp caster sugar
250g cold unsalted butter, cubed
3 egg yolks
2tsp vanilla extract
50ml iced water (used only with rub-in method)
cloves, pits removed
1 egg, beaten with 1 tbsp water (for egg wash)
Creaming Method:
- Preheat oven to 170c. Line baking tray/sheet with greaseproof paper
- Whisk the first 5 ingredients together. Sift, twice.
- Cream butter and sugar together until light and fluffy. Add yolk one at a time and beat well.
- Fold in flour mixture and combine to form a smooth pastry dough. Divide into 3 portions and chill in refrigerator for 1 hour.
- To make tarts, work with one portion of the dough at a time. I used a jam:pastry ratio of 1:3. I used 5g of jam to 15g of pastry. Roll the jam into tiny balls. Take a pastry dough and flatten to about 4mm thick. Place jam in the centre and wrap the dough up so that the jam is totally enclosed. Roll into ball shaped and placed on a baking tray at 3cm interval. Repeat with remaining portions of pastry and jam.
- Brush tarts with egg wash to glaze and stick a clove into it. Place in preheated oven for 25-30 minutes or until golden brown. When done, cool on rack before storing airtight.
Rub In Method:
- Preheat oven to 170c. Line baking tray/sheet with greaseproof paper
- Whisk the first 6 ingredients together in a large mixing bowl until well blended. Add butter cubes and rub them in with your fingertips or a pastry blender, until the mixture resembles fine breadcrumbs.
- Whisk egg yolks, vanilla and water together and add to butter-dough mix from step 1. Mix using a spatula and form into a ball. Knead lightly for 5 seconds, then divide into 3 portions. Wrap in plastic wrap and chill in refrigerator for 1 hour.
- Follow steps 5-6 of creaming method above
Makes about 40-45 tarts. Note that you would still have some leftover jam. Use the pineapple as you would normally use jam on toast for breakfast!
*Use 400g plain flour if you don't want the hassle of weighing so many different types of flour and powder! You can substitute plain flour and cornflour with 340g cake flour.
♥ Two Different Presentation of Nyonya Pineapple Tarts
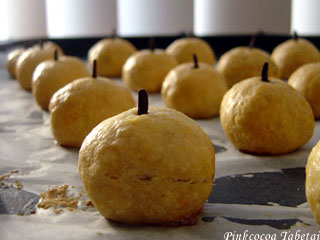
There are basically three different ways of presenting a nyonya pineapple tart. The two most commonly seen are those as shown at Jo's recipe. I actually grew up on all-enclosed type of pineapple tarts that's why I am making mine into these cute little balls. Another reason is it's the easiest way to make the tarts looking professionally cute!
♥ Cute Mini Pineapple Tarts
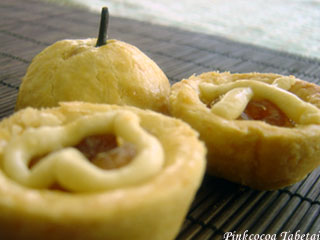
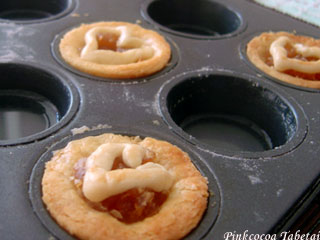
I have actually wanted to try making pineapple tart, open-styled but had found it hard without a proper pineapple tart mould. Then I thought why not make the pineapple tart to appear more tart-like (er?) so I took the pastry dough and press them into my mini muffin pan (greased and flour). Bake in oven without the jam for 10min. Remove from oven, add jam and cute pastry top design if you like. I roll out the pastry dough into thin long log and shape them into heart shape. I have also done a criss-cross design. Brush with egg wash to glaze and return to oven for a further 15-20 minutes or until golden brown.
♥ Open-styled Pineapple Tarts
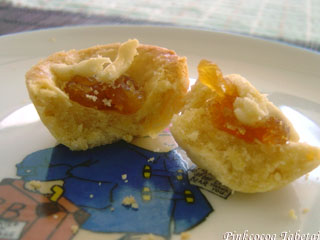
So here's a cross-section of my more tart-like pineapple tart. I think I have been a little skimpy with the jam but trust you need only a tiny bit of jam to accompany the sweet pastry. This particular tart is made using the creaming method and the pastry is very soft, tender and creamy.
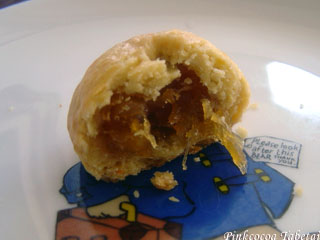
♥ All-enclosed Pineapple Tart
Here's the cross-section of the tiny pineapple tarts made using the rub-in method and the pastry is so much crunchier and more cookie-like. The 15g of pastry and 5g jam actually produces a fairly decent size of tarts. It took me three bites to finish. ShinChan can swallow one tart at a time without biting. I was tempted to make even smaller size tarts but scraped the idea. Just imagine about all the extra work and care I have to put in to weigh more jams and roll more tarts!
I am sorry my entry is a day late! I actually have all the photos ready but just didn't manage to find the time to write up the entry. I hope I still make it to SHF#9!
♥ Check back at Life in Flow for a full list of Tantalising Titillating Tempting Tarts!


♥ pinkcocoa tabete @ Saturday, June 18, 2005

|
<< Home