 ♥ Bitter Chocolate Kahlua Tart
The thought of velvety creamy chocolate ganache along with the crumbly texture of buttery crust lingering on my tastebuds have been weighing on my mind for a long long time after spotting a bitter chocolate tart with
Baileys in
Good Living's Winter + Food - Favourite Hearty Recipes from Good Living.
The addition of liquer has certainly made this tart popular around the house. ShinChan's eyes shone so brightly on my suggestion in giving a try at making chocolate tart with Baileys. So there I was in the kitchen with my
pre-made tart cases and the chocolate filling was so easy to put together.
♥ tabeshimashita @ place on date
♥ Bitter Chocolate Kahlua Tart
The original recipe had called for Baileys but I decided to substitute it with Kahlua last minute, seeing that we have some Kahlua to rid of. I had also made half a batch of the recipe which works just fine and the half batch fills 2 of my 12cm tart cases perfectly.
♥ Bitter Chocolate Kahlua Tart
based on Jill Dupleix's recipe from Good Living's Winter + Food
-fills a 20cm tart or 4 x 12cm smaller tart
300ml thickened or whipping cream
200g dark chocolate (I used Lindt 70% cocoa)
50g butter, chopped
2tbsp Kahlua*
- Finely chopped the chocolate and place in a heatproof bowl.
- Heat the cream in a heavy-based saucepan on low heat until just before boiling point.
- Slowly pour the cream over the chocolate. Leave for 1 minute, then mix well with a spatula, working from the centre outwards.
- Add butter and stir until smooth
- Stir in the liquer and pour into the tart case**. Leave in a level place to cool, then regrigerate for 3 hours before serving.
notes:
* Original recipe called for Baileys Irish Cream.
** Made the chocolate filling only after the tart cases are completely cool ie. after step 15 of the shortcrust recipe.
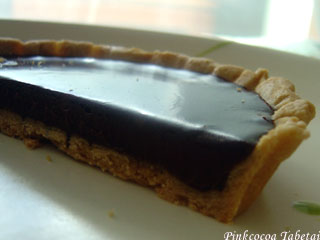
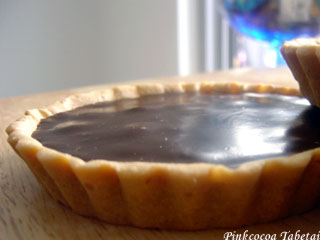
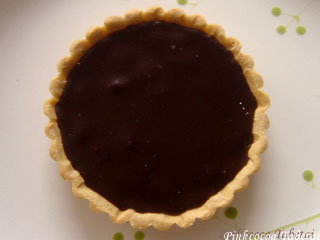
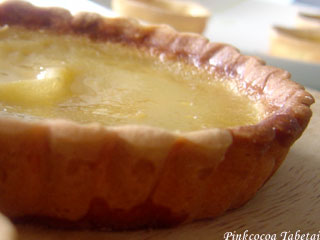
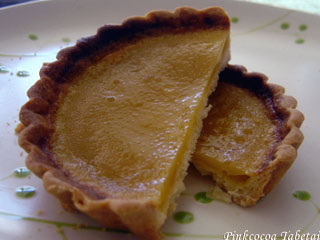
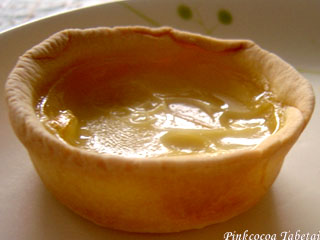
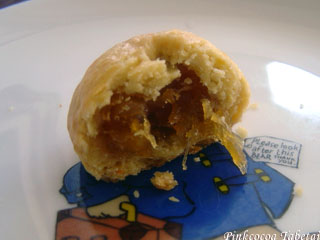
♥ Bitter but velvety smooth chocolate filling
The chocolate filling was rather bitter which is not surprising given the tart bears the name "bitter". I am just a little disappointed that the flavour of Kahlua didn't turn out too much at all. Nevertheless the chocolate filling was indeed velvety smooth, and very very thick and creamy - just the perfect dessert for someone who wants a chocolate dessert but loathe at the sweetness.
The filling has worked well with the shortcrust tart cases and I am quite happy. I am thinking maybe next time I could made a jaffa chocolate tart - easily done by adding bits of orange zest and either Grand Marnier or Cointreau! It's yum. by the way, the tart is great with ice-cream!
Continue Reading Bitter Chocolate Kahlua Tart
After a few inquiries and requests after her
sweet short crust, Pinkcocoa shall now reveal what she did with her tart cases. Yes
Clare and
AugustusGloop, the following two posts are for you gals!
 ♥ Bitter Chocolate Kahlua Tart & Egg Custard Tart
And now for the long awaited moment. Announcing Pinkcocoa's experiment with her tart cases...*drum beating*...Here goes: The tarts Pinkcocoa made were Egg Custard Tart and Bitter Chocolate Kahlua Tart!
I am posting up the egg custard tart recipe first before the chocolate tart. Pinkcocoa just got a little cheapscape. I am seperating one post into two! ="p
♥ tabeshimashita @ pinkcocoa's kitchen during some time in June 2005
♥ Egg Custard Tart
As I mentioned in my daan tart post, I was craving for some daan tart and had wanted to make some for IMBB#16. Unfortunately the daan tart came out nothing like the one we had at yumcha. Since I had some of the egg mixture left over from my failed daan tart attempt, I thought why not do another experiment and use the egg mixture up with my tart cases.
♥ Egg Custard Mix
adapated from Leisure Cat
140g caster sugar
360ml water
2 large eggs
60ml evaporated milk
1tsp vanilla extract
- In a saucepan add sugar and water and cook over low heat until sugar dissolves. Cool slightly.
- Beat eggs in large bowl and slowly pour in sugar syrup while stirring continously. Mix in vanilla extract.
- Strain egg mixture and it is ready to be used!
- I pour some of these egg mixture into my tart case at step 14 of the shortcrust pastry and bake until the egg mixture turns into solid custard, about 15-20 minutes.

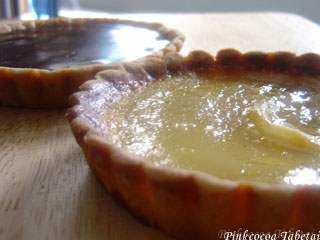
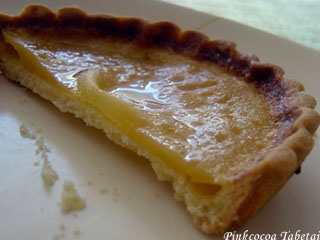
♥ Egg Custard Tart
I took the following photos about 3 days after I made the tart and the egg custard has actually started to dry up and shrink from the side. So it's definitely best to enjoy these tarts on the day they are made. I am thinking these tarts can keep for about 2 days without refrigerating it. I didn't store it in the fridge given the cold weather we have here in Sydney.
♥ Half-moon shaped egg custard tart
The egg custard was rather delicious with the shortcrust pastry. I guess I might have done a bigger version of the mini daan tart in shortcrust pastry at yumcha. The egg custard is very soft and tender, and very velvety and smooth in your mouth! I love this egg custard recipe. The egg custard tasted just like the one we had in yumcha. Oh well, almost like the one.
♥ Soft and tender egg custard
Looking closely at the egg custard, you would notice the egg custard has shrunk slightly from the sink and has sunk a bit too after leaving it in room temperature for 3 days. This only ascertain that the tarts definitely taste the best on the day it is baked.
Up next will be the Bitter Chocolate Kahlua Tart!
Continue Reading Egg Custard Tart
 ♥ Sweet Short Crust
I actually made these tart cases for SHF#9 the other day. These were, in fact, made a few days before I even got around to my pineapple tarts. Oh yes, I did have the pictures all edited and ready to use but I just didn't manage to find the time to go about writing about these tarts before the SHF due date.
Be it tarts or pies, both are something that I have never ever attempted before. In fact, I never thought about getting my hands dirty into tarts or pies until the theme - Tantalizing Titillating Tempting Tarts for SHF#9 came about. I just thought it was quite a nuisance to make tarts and pies, especially after reading about all the warnings and you-have-to-follow-with-my-exact-description-or-you-will-fail instructions re making pies and tarts. They scared me...a lot!
Anyhow, I finally got myself into making some shortcrust and I am actually very surprised. It wasn't as hard as it had seemed! Making the shortcrust dough is basically the same as how you would go about making cookies. It's only until the roll-out-then-lay-over-and-press-and-cut-onto-tart-tin part that got me very confused . I would press the dough too hard onto the tin where the dough actually flattened too much under my finger's pressure and as a result, the crust was too thin in some parts and thick in others. I guess I will just have to do a lot of practice before getting the correct and perfect thickness.
♥ tabeshimashita @ pinkcocoa's kitchen in mid June
♥ Tart Cases
I have used a shortcrust recipe from a Japanese (translated into Chinese) Baking Book - My First Sweet Baking Book by Yasuyo Shida. The book has step-by-step instructions which I have found very useful for beginner who doesn't have someone to guide you ie. people like me! I have adapted Shida's shortcrust recipe and added fillings of my own.
♥ Basic Shortcrust Pastry
enough for 21cm tart tin with removable bottom*
100g unsalted butter, softened
50g icing sugar
1/2 egg, beaten**
1/2tsp vanilla extract
200g cake flour***
- Bring butter and egg to room temperature. Preheat oven to 170c. Brush tart tin with melted butter. Sift flour twice.
- In a large mixing bowl, using a spatula, beat butter until creamy.
- Add in sugar and beat until light and fluffy.
- Add one third of the beaten egg and mix until just combine. Repeat twice with remaining egg.
- Add vanilla extract and mix until just combine.
- Add sifted flour all at once onto the butter mixture and using a cutting motion, "cut" in and scrap from the bottom up the flour with the butter mixture until just combine or when a dough is formed
- Knead dough lightly for 5 second. Flatten slightly and cover with cling wrap before going into the fridge for 30minutes.
- Take dough out from fridge, unwrap and place dough onto the piece of cling wrap you just unwrapped. Take another piece of cling wrap, slightly bigger than the dough and place it over the dough. Using a rolling pin, roll dough out to 2-3mm thick and slightly larger than your tart tin.
- Take away the cling wrap on top of the dough. Grabbing from both side the cling wrap on the bottom, flip the dough and lay it over the tart tin.
- Without taking away the cling wrap, using your index finger, lightly press dough into tin, making sure there is no air gap between the tin and the dough, especially at the corner and side.
- Take rolling pin and roll over on the top of the tin to remove excess dough. Take away cling wrap and lightly peel away the excess dough. Prick bottom of tart with fork to ensure there is no air pocket.
- Cover with cling wrap and let rest in fridge for at least 30 minutes
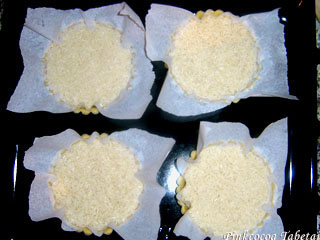
- Place a sheet of greaseproof paper over the tart and lay some baking beans or rice or any sort of beans on top. This is called blind baking. Bake in oven for 15 minutes.
- Take away paper and beans, and bake for a further 12-15 minutes or until golden brown if you want a blank tart case, or add in fillings at this step and bake for 12-15minutes. Alternatively, you might not need to do blind baking but fill your tarts and bake straight in the oven for 30-40 minutes.
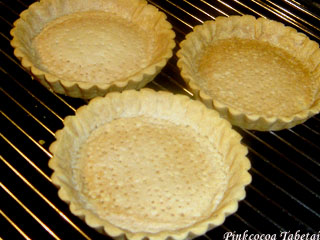
- Let cool for 5 minutes before turning out onto rack to cool completely
notes:
*I used 4 x 12cm-diameter tart tins
**If you find it troublesome to use just half an egg, use an egg yolk like I did!
***Plain flour is fine if you don't have cake flour. Alternatively, you can make your own cake flour by replacing 20% of plain flour with rice flour or corn flour.
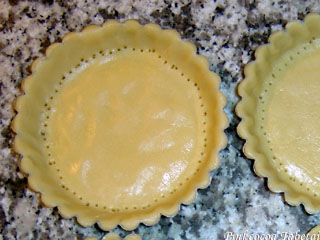
♥ Pricking Corners
Make sure you prick the corner to ensure there is no air pocket. This is the first place I prick, using a fork, before proceeding to the rest of the pastry.
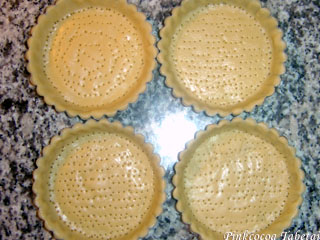
♥ Pricking All Over the Bottom
After I pricked the corner, I randomly pricked the rest of the pastry. I was tempted to prick a nice symbol but alas, I am just so bad when it comes to art so I ended up pricking the pastry in random order.
♥ Blind Baking
I used rice as my baking weights since I don't have the proper baking weights. You can also use soy beans, red beans, green (mung) beans and even lentils. After baking, the rice has a very sweet and buttery fragrant that stick to it. You can still cook the rice which I did and the rice tasted a little sweeter than usual!
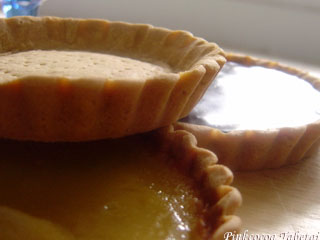
These shortcrust pastry was rather well received. It was quite smooth and buttery. The tart cases were also very delicate. I actually broke one when I was transporting it for a photoshoot. I should have been more careful! Anyhow, I quite love this shortcrust pastry and I think I will making more of this in the future. Yessss! I can finally say yes to a apple tart order now :-)
Continue Reading Sweet Short Crust
 ♥ Daan Tart - A Failure!
I know I have just missed out on
IMBB#16 - Eggs. I actually got my hands on early for this month's IMBB. The first thing that came to my mind when the theme - eggs was announced, was the crispy flaky Hong Kong-style
Yum cha daan tart (egg custard tart).
I had followed a recipe from Leisure Cat but I found the instructions weren't clear enough so I decided to just fool around in the kitchen with the recipe. Unfortunately, the pastry turned out very dry and hard. I must have done something wrong in the folding and rolling out steps so the pastry was not flaky and puffy at all. *sigh* And also it might be because I didn't use lard as I was supposed to. I used ghee.
On the other hand, the egg custard filling was very soft and tender, and tasted just like the one you would get at yum cha. I love the filling but feel really bad about the pastry. I think I will have to experiment a little bit more before I can get to an acceptable level. >.<
Don't worry, pinkcocoa strives to improve!
Continue Reading Daan Tart - A Failure!
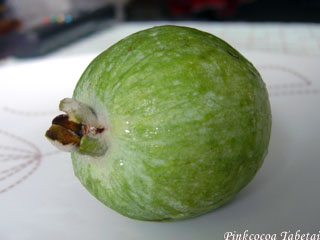 ♥ Cute Little Green Eggshaped Fruit
We were at Fratelli Fresh the other day and spotted this cute little green egg-shaped fruit. Just when I was wondering what this fruit was, a gentleman with a whole basketful of these green fruits kindly told me that the little fruits were
feijoa - a type of guava.
I was also told that the fruit is quite delicious. Having never tried this fruit before except in
a bottle of fruit juice and seeing the gentleman with the basketful of feijoa, I decided to grab two to try it out.
♥ tabeshimashita @ pinkcocoa's kitchen during end of May
♥ Feijoa A$7.50/kg
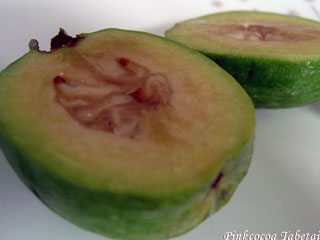
Feijoa is native to South America and is also known as pineapple guava. The fruit emitted a pleasant aroma that smells a little like guava, yet there is this sweetness and fragrant attached to it that it didn't seem too much like a guava. A pinkish-greenish flesh greeted us when the feijoa was cut open.
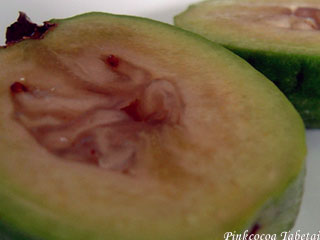
♥ Pinkish Centre
We decided to enjoy the fruit by scoop out the flesh with a spoon. The pinkish flesh in the middle was the sweetest and has a very complicated flavour. The first mouthful reminded me of bubblegum flavour ice-cream! Second mouthful, we could taste a little banana and strawberry.
As we move outwards to the skin, the flesh became more and more tarty. The texture more and more like that of a guava and not as sweet too. We weren't sure if we could actually eat the skin but I am pretty sure we could. I took a bite of the skin and it was grainy and rather dry, just like that of a guava! It's also a little bitter.
Really the flavour is just quite complicated. It's kinda hard to explain here. You gotta try it yourself! I am not totally addicted to feijoa as yet. To be honest, I am not sure if I would be buying feijoa the second time. I think I still prefer the guava that's more commonly known to me. Then again, our tastebuds are changing all the time so you know never I might get really addicted to these cute little green fruits! :)
Continue Reading Pineapple Guava - Feijoa
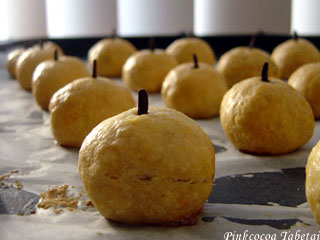 ♥ Nyonya Pineapple Tart
When I first found out the theme of this month's
Sugar High Friday - Tantalizing Titillating Tempting Tarts, what else could I have possible made but my favourite
Nyonya Pineapple Tart!
If you have not already noticed
my obsession with these tiny bite-size morsels, let me repeat once again - I am absolutely in love with Nyonya Pineapple Tart! *sorry, ShinChan*
♥ tabeshimashita @ pinkcocoa's kitchen on 17 june 2005
I have been dreaming about having good decent melt-in-your-mouth Nyonya Pineapple Tarts ever since Chinese New Year. It was after I finished my box of the golden tarts that I embarked on making the tarts using my own hands because my body simply wants more and more!
I have experimented with a couple of pastry recipe and finally found one that I quite like. My pastry recipe is actually a combination from Jo's recipe and that from Shiok! There are two methods of going around the pastry dough. First up, the rub-in method where you rub butter into flour. And second, the creaming method where you cream the butter and sugar together before adding in flour.
I have found the rub-in method produces a lighter and crunchier pastry, whereas the latter produces more of a creamier melt-in-your-mouth texture. Personally I prefer the pastry from the creaming method.
As with the pineapple jam (which is really quite a bit of work out), I used the method from Makan-lah! but had adjusted the sugar to taste, depending on whether fresh or canned pineapples are used. I used canned pineapple this time since I didn't manage to get fresh pineapples. If you can, please use fresh pineapple because the texture and flavour from that of a fresh fruit is so much more flavoursome than those from a can.
♥ Nyonya Pineapple Tarts
Pineapple Jam
2 large cans (880g) pineapple pieces in natural juice
1tsp cinnamon powder*
220g caster sugar, plus more if necessary**
- Drain pineapple from cans, reserving juice. Chop pineapple roughly and here comes a good arm toning exercise. With all your might and strength, take a handful of the pineapple pieces and squeeze out as hard as you can all the juice from the pineapple. Don't worry if it's not super dry. It's perfectly alright if the pineapple is still slightly damp.
- Combine chopped pineapple pieces, cinnamon powder and caster sugar in a large, wide pot (preferably non-stick. I used my non-stick skillet). Stir over medium heat until sugar dissolves. Taste, and adjust sugar as necessary. You can also add a bit of honey if you like.
- Keep stirring the mixture until it reduces to a thick, ambered coloured jam. If in the process of cooking, you found the mixture has dried up too quickly, add a tablespoonful of the reserved juices and proceed on cooking. If you prefer a more citric flavour especially when you are using canned pineapples, add some lemon or lime juice to give it a more zingy kick.
- Remove from stove and set aside to cool. Once cool, store jam in fridge in airtight container. Jam can be kept in the fridge for a long time in an airtight container.
note: make jam the day before making pastry
* Original recipe calls for 3 cinnamon sticks. You can also add in 1 whole star anise, broken into pieces; and cloves, if you like. I didn't include them since I don't like the taste.
** Do adjust the sugar to your taste. I think the original recipe calls for around 400g caster sugar! I think it's a tad too sweet for me.
Pastry
45g milk powder*
15g custard powder*
65g corn flour*
275g plain flour*
2/3tsp salt
2tbsp caster sugar
250g cold unsalted butter, cubed
3 egg yolks
2tsp vanilla extract
50ml iced water (used only with rub-in method)
cloves, pits removed
1 egg, beaten with 1 tbsp water (for egg wash)
Creaming Method:
- Preheat oven to 170c. Line baking tray/sheet with greaseproof paper
- Whisk the first 5 ingredients together. Sift, twice.
- Cream butter and sugar together until light and fluffy. Add yolk one at a time and beat well.
- Fold in flour mixture and combine to form a smooth pastry dough. Divide into 3 portions and chill in refrigerator for 1 hour.
- To make tarts, work with one portion of the dough at a time. I used a jam:pastry ratio of 1:3. I used 5g of jam to 15g of pastry. Roll the jam into tiny balls. Take a pastry dough and flatten to about 4mm thick. Place jam in the centre and wrap the dough up so that the jam is totally enclosed. Roll into ball shaped and placed on a baking tray at 3cm interval. Repeat with remaining portions of pastry and jam.
- Brush tarts with egg wash to glaze and stick a clove into it. Place in preheated oven for 25-30 minutes or until golden brown. When done, cool on rack before storing airtight.
Rub In Method:
- Preheat oven to 170c. Line baking tray/sheet with greaseproof paper
- Whisk the first 6 ingredients together in a large mixing bowl until well blended. Add butter cubes and rub them in with your fingertips or a pastry blender, until the mixture resembles fine breadcrumbs.
- Whisk egg yolks, vanilla and water together and add to butter-dough mix from step 1. Mix using a spatula and form into a ball. Knead lightly for 5 seconds, then divide into 3 portions. Wrap in plastic wrap and chill in refrigerator for 1 hour.
- Follow steps 5-6 of creaming method above
Makes about 40-45 tarts. Note that you would still have some leftover jam. Use the pineapple as you would normally use jam on toast for breakfast!
*Use 400g plain flour if you don't want the hassle of weighing so many different types of flour and powder! You can substitute plain flour and cornflour with 340g cake flour.
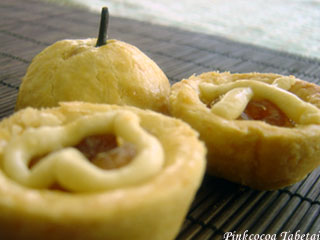
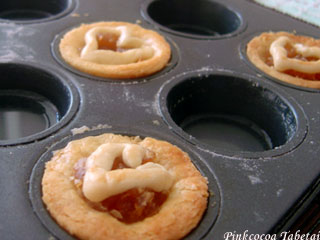
♥ Two Different Presentation of Nyonya Pineapple Tarts
There are basically three different ways of presenting a nyonya pineapple tart. The two most commonly seen are those as shown at Jo's recipe. I actually grew up on all-enclosed type of pineapple tarts that's why I am making mine into these cute little balls. Another reason is it's the easiest way to make the tarts looking professionally cute!
♥ Cute Mini Pineapple Tarts
I have actually wanted to try making pineapple tart, open-styled but had found it hard without a proper pineapple tart mould. Then I thought why not make the pineapple tart to appear more tart-like (er?) so I took the pastry dough and press them into my mini muffin pan (greased and flour). Bake in oven without the jam for 10min. Remove from oven, add jam and cute pastry top design if you like. I roll out the pastry dough into thin long log and shape them into heart shape. I have also done a criss-cross design. Brush with egg wash to glaze and return to oven for a further 15-20 minutes or until golden brown.
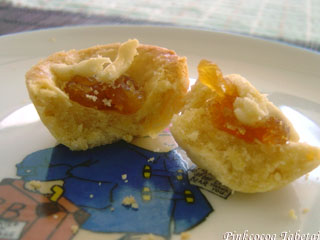
♥ Open-styled Pineapple Tarts
So here's a cross-section of my more tart-like pineapple tart. I think I have been a little skimpy with the jam but trust you need only a tiny bit of jam to accompany the sweet pastry. This particular tart is made using the creaming method and the pastry is very soft, tender and creamy.
♥ All-enclosed Pineapple Tart
Here's the cross-section of the tiny pineapple tarts made using the rub-in method and the pastry is so much crunchier and more cookie-like. The 15g of pastry and 5g jam actually produces a fairly decent size of tarts. It took me three bites to finish. ShinChan can swallow one tart at a time without biting. I was tempted to make even smaller size tarts but scraped the idea. Just imagine about all the extra work and care I have to put in to weigh more jams and roll more tarts!
I am sorry my entry is a day late! I actually have all the photos ready but just didn't manage to find the time to write up the entry. I hope I still make it to SHF#9!
♥ Check back at Life in Flow for a full list of Tantalising Titillating Tempting Tarts!
Continue Reading SHF#9 - Nyonya Pineapple Tarts
So I have been extremely lazy these few weeks but let me assure you, my heart still rests on this blog. I am *always* worried about not posting anything when I haven't posted for quite a while. But hmm all thoughts only, zero action taken. Ya, call me lazy pink pig if you like :p
 ♥ Giff's Corner - Hainanese Chicken Rice
Anyway, my dearest friend of all,
Giff has kindly written
yet another post for me! *yippeee* The two of us had been talking about Hainanese Chicken Rice a while back and it just happened that Giff had actually cooked the dish herself. And it just so happened that she had also taken a few photos of the dish and had copy of the recipe.
So Giff wrote a post for me so that I won't feel so much guilty anymore. *grin* What are best friends for! Read on for Giff's post! ;-)
♥ tabeshimashita @ Giff's Kitchen during summer 2005
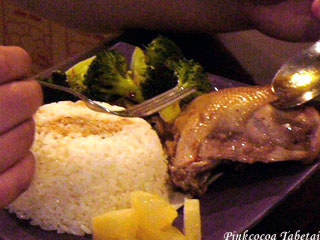
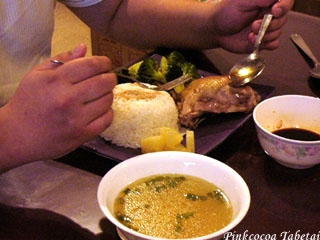
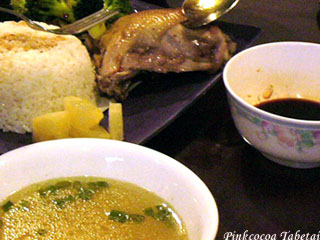
♥ Giff's Hainaese Chicken Rice with pineapple and broccoli
Pinkcocoa and I were just discussing about Hainanese chicken rice. Apparently, there are so many versions out there. Some recipe requires pandan leaves, some don't. I personally like the aroma of pandan but it's so rare in New Zealand, you either have to get frozen one or just do without. I happened to go with the latter on this occasion because I didn’t want to drive 15 minutes to get a packet of frozen pandan leaves.
Without much ado, here's my version of Hainanese chicken rice. The credit has to go to Connie Clarkson. In her book, Asian Flavour, Connie talks about the females in her family and their recipe. It was interesting not only to know the recipe but also to know the people who made them. Connie Clarkson is a Singaporean who then settles in New Zealand after she studied in Dunedin, NZ. Her book mentions of her culinary adventure substituting Asian ingredients in the 70s when Asian ingredients are still really rare.
♥ Connie Clarkson's Hainanese Chicken Rice Recipe
taken from Connie Clarkson's Asian Flavours
♥ Ingredients:
Enough chicken stock to cover a 1.5kg chicken
1 tsp light soy sauce
1 tsp crushed garlic
1 tsp crushed fresh ginger
1 spring onion, chopped into quarters
1 tbsp coriander, chopped (I didn’t want to chop it, I prefer it in large stalks)
1 tbsp rice wine
1.5kg chicken
♥ Glaze for cooked chicken
Made of 1 tsp each of dark soy sauce, oyster sauce and sesame oil
♥ Garnish:
1 cucumber, seeded, skinned and sliced (omitted in my recipe)
½ small pineapple, skinned and sliced
fresh coriander (omitted)
flavoured rice
chilli ginger sauce (omitted)
- In a large stockpot, bring the stock, soy sauce, garlic, ginger, spring onion, coriander and rice wine to the boil.
- Carefully immerse the whole chicken in the stock. Turn off the heat, cover the pot and let the chicken stand for 15 minutes.
- Remove the chicken from the pot, plunge into a sink of cold water and drain.
- Bring the stock back to the boil, add the chicken and repeat the steeping process two or three times until the chicken is cooked (about 45 minutes steeping time in total).
- Reserve the stock for cooking the rice and the soup course.
- Cut the chicken into bite sized pieces and brush with prepared glaze. Bone the chicken if desired.
- Garnish with cucumber and pineapple and serve with flavoured rice, chilli ginger sauce and dark soy sauce.
- Serve the remaining stock as accompanying soup.
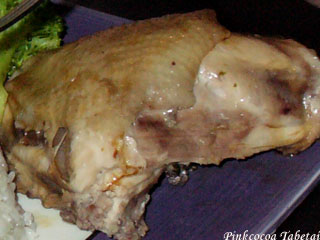
♥ Tender Succulent Chicken Maryland
Of course, I took the liberty to modify the recipe again to my liking and according to the stock in my pantry.
♥ Giff's Modification on Hainanese Chicken Rice Recipe
♥ Ingredients:
Enough to serve 5 people
Enough chicken stock to cover 5 chicken thighs.
♥ Here's how to cook the chicken stock:
Bring water to boil. A dash of light soy sauce. 3 crushed garlic. (I choose plump ones). 1 knob of crushed ginger. Spring onions and Coriander to taste. 1 tablespoon of cooking wine.
I cooked the chicken thigh for 25-30minutes. Don't really like mushy chicken.
For the rice, I measured 2 bowls of Sunlong long grain rice into rice cooker.
Then, I carefully scooped out the chicken stock into the rice cooker. Then proceed like how you would normally cook rice in rice cooker.
I ensure there's enough stock left for soup course.
♥ Giff's Hainaese Chicken Rice - Side Dishes, Soup and Sauce
As side dish to accompany the chicken rice, I blanched some broccoli. I put some salt and a few drops of sesame seed oil to make the broccoli fragrant. For the broccoli’s sauce, microwave 1 tbsp of Hoisin sauce and 2 tablespoon of water for 20 seconds. Stir and pour over the drained broccoli.
I also use the diced pineapples as my second side dish. Before the chicken is served, I dashed some sesame seed oil and light soy sauce on the chicken for taste. Serve the remaining stock as accompanying soup garnished with finely chopped spring onions.
Continue Reading Special Guest Blogging
Giff's Corner - Hainanese Chicken Rice
Oh dear, it was definitely one of the coldest morning in Sydney the first saturday in June. It was so hard to bid farewell to our tender pillows, hearty quilts and we just want to stay snug up in the bed! Alas, we managed to drag ourselves away from the soft and tender bed, and we were off to the monthly growers' market in Pyrmont! *yay*
 ♥ The Sun is Out!
As we were driving towards the city, we noticed the city including the harbour bridge and the Sydney Tower were totally out of side. The whole city had been covered up by a very thick fog, so thick that we felt like were in London! Luckily, by the time we reached the market at around 8-ish, the sun was finally out!
♥ tabeshimashita @ Pyrmont Growers' Market on 4 June 2005
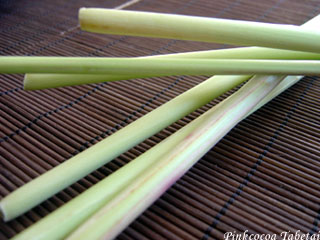
♥ Organic Lemongrass
Here's a stall that I have to mention. I bought some lemongrass (A$2 for a bunch of 3) from a stall that sells lime marmalade a few months ago. I am sorry I actually didn't remember the name except that it is a stall that sells citris stuff like lime marmalade, kaffir lime leaves, fresh kaffir limes and fresh limes. So I bought some of their lemongrass a few months ago. At A$2 for a bunch of 3 organic lemongrass, I though it was quite a bargain. The lemongrass was very tender, hardly needing to remove the outer layers as you would normally do. And very aromatic too though not on smelling but after you pound or chop it.
I was at the market last month and noticed the stall did not have any lemongrass anymore so I took up the courage to ask the gentleman behind the stall about it. He said it was actually a side product of their farm and did not sell as good so they decided not to bring them over to sell. I mentioned that I really love their lemongrass and pity that they didn't have any. But this month at the market, I am just overly delighted to see the lemongrass are back again! And oh my, the gentleman actually remember me. I am so touched that he brought the lemongrass just for me :-)
To be honest, both ShinChan and I thought the gentleman was a little scary ie. not as friendly and vibrant. And I was standing there deciding whether to buy just one bunch or two. I decided to just buy a bunch and the gentleman was sort of staring at us with that "are you sure you just want to buy one bunch" look on his face. It was a little scary to us and a little awkward. In the end, I decided to buy 2 bunches. And guess what, I got the second bunch free! So yup, it was 2 bunches organic lemongrass for just A$2.
No photos of the actual stall though since we were quite scared of the gentleman at that time. However after the free lemongrass episode, we discovered the soft and friendly side of the gentleman! He is the Asian father type - love in the heart but never show on face or via mouth!
Okie, guys. Now it's back to the normal food pornography, er, I mean food pics.
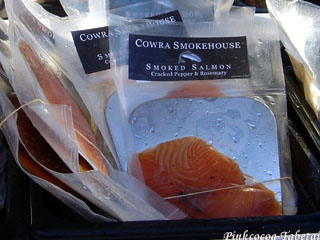
♥ Cowra Smokehouse's Smoke Salmon
Cowra Smokehouse is one of our favourite stall at the market. Their smoke salmons are quite something with 4 different flavours. I can't remember all of them though. We had tried out their tomato based smoke salmon and it was delicious though a little salty. Yummy with sour cream. There is also a soy and honey flavour!
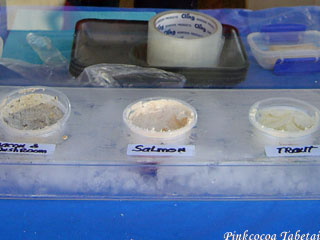
♥ Cowra Smokehouse's Pate
And their pate are yummy too. From left: bacon and mushroom, smoke salmon, smoke trout. Our personal favourite is the bacon and mushroom. I found it hard to stop dipping my crackers in the pate.
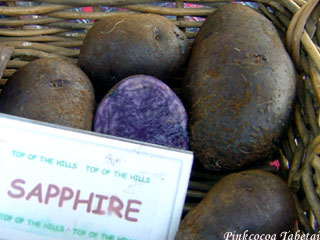
♥ Sapphire Potato
Isn't this potato so beautiful with its purplish colour. No wonder it has such beautiful name!
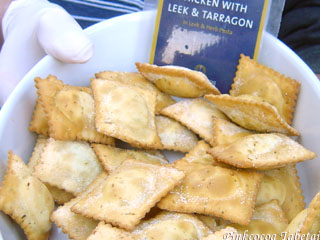
♥ Pastabilities' Chicken with Leek and Tarragon Ravioli
It was such a cold morning and we longed for something hot. These shallow-fry ravioli samples from Pastabilities were just perfect!
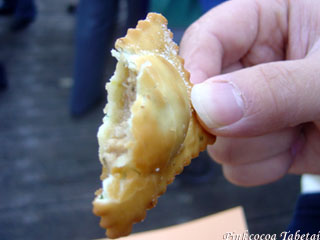
♥ A bite of Pastabilities' Chicken with Leek and Tarragon Ravioli
Crunchy, creamy and pipping hot, no wonder these ravioli sample are so popular at the market.
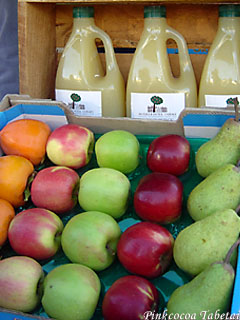
♥ Mirrabooka Farm
Have I ever told you guys that we are the regular customers of Mirrabooka Farm ever since I bought some fresh figs from them at the Northside Produce Market? From left, persimmons, pink lady, granny smith, *not sure about this type of apple variety. Anyone?* and pear. These are sold in bags of 1.5kg at A$5 except for the persimmons which were $5 per kg bag.
We bought the pear and persimmon. Love the pear, sweet and crunchy. But the persimmons were quite bitter and tarty, leaving a weird aftertaste. Apparently the persimmons were not grown by Mirrabooka Farm. They were helping their neighbour to sell at the market.
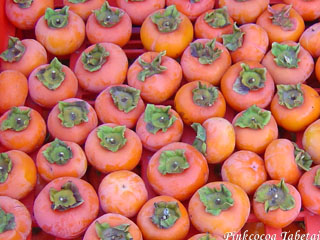
♥ Lotsa Persimmons or Fuyu Fruit
I am just so excited by the sight of tonnes and tonnes of persimmons! It's my favourite winter fruits :)
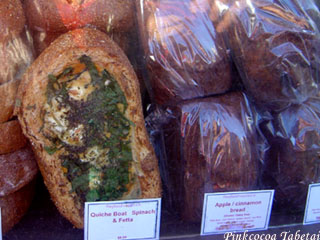
♥ Shepherd Bakehouse's Quiche Boat
Sheperd Bakehouse has something new this month - Quiche Boat which just looked so cute! We actually saw them at the Northside Produce Market last month but these were sold out before I returned to try to snap a pic!
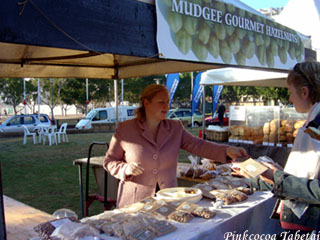
♥ Mudgee Gourmet Hazelnuts
New at the market this month was Mudgee Gourmet Hazelnuts.
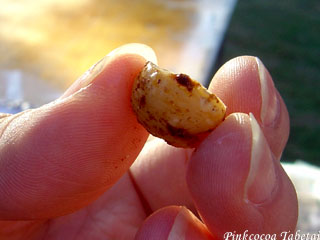
♥ Mudgee Gourmet Hazelnuts - Barbeque I think
We couldnt quite remember the flavour of the hazelnuts that we tried but it was definitely a savoury flavour. I didn't try the hazelnut, ShinChan did but he couldnt remember the flavour. If it was me, I would have tried out honey roasted flavour. ShinChan said the nut was fresh and very crunchy.
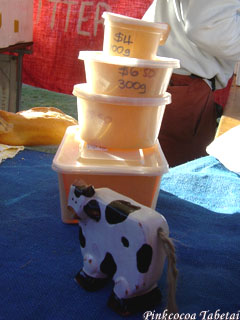
♥ French Style Cultured Butter
Another new stall at the market this month is French Style Cultured Butter! The angmoh or gweilo really loves their butter. The stall was jam-packed with people. Can anyone tell me the holy goodness of french style cultured butter? Sorry, guys. I am just not a butter person - I hate butter on my sandwich and toast. >.<
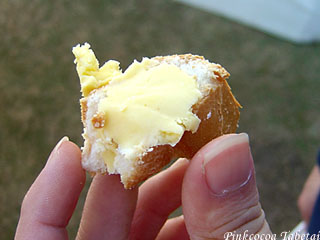
♥ Salted French Style Cultured Butter on baguette
Since I am not a big fan of butter, ShinChan naturally became the official food sampler as I sent him on a mission to try out what's so good about cultured butter. He tried the salted butter but didn't feel much difference except that it is rather rich and creamy. Perhaps he should have tried the unsalted version.
The market is always full of surprise! I can't wait until the next market. :-)
♥ Pyrmont Growers Market
7am - 11am
every first saturday of the month (except January)
Pyrmont Bay Park opposite Star Casino
Continue Reading Pyrmont Growers Market - June
 ♥ A Pool of Sticky Rice Dumplings!
It just seems so easy to disregard yet another important cultural festival when you are in a foreign land. I wouldn't have known
duan wu jie 端午節 (the Dragon Boat Festival or the Dumpling Festival) is just around the corner until a friend tried to drown us in a pool of sticky rice dumplings! Having said that, if you had been to any Chinese-Asian grocery stores these few weeks, you would have noticed these cute little cone-shaped yummies wrapped up in bamboo leaves. This serves as an excellent reminder that it is time indeed to commemorate one of the greatest patriot in Chinese history -
Qu Yuan 屈原.
The Legend of the Patriot - Qu Yuan 屈原投江
During the Warring State Period of Ancient China, there lived a wise and articulate poet named Qu Yuan. Serving as the minister to Chu Huai Wan (Emperor Huai) of the Chu Dynasty 楚國, his intelligence had antagonised other court officials, who were such evils and exerted their devilish influence to turn Emperor Huai against him. Eventually, Qu Yuan was dismissed and exiled. Though sad to see the gradual decline of his mother state, Qu Yuan was a persistent man and did not give up on hope. He travelled extensively to teach about his ideas and had written many great books. He was a man well loved by the people of the Chu Dynasty.
It was on the 5th day of the 5th lunar month when Qu Yuan received news that his beloved country had been defeated by the Qin Dynastry. Devastated and inconsolable, Qu Yuan ended his life by jumping into the Mi Luo river. The villagers who were despaired on hearing Qu Yuan's suicide, rushed to the river in an attempt to rescue him. When they failed to rescue Qu Yuan and also to find his body, they were prepared to do anything to preserve the body of the great poet they loved. The people brought out their drums and gong onto their boats, and with great might, they beat upon them while rowing on the river, hoping to scare away the sea dragon living in the waters. This is how the famous dragon boat race came about.
They also became worried that the fish in the river would start feeding on the body. As an attempt to prevent the fish from feeding on the body of Qu Yuan, people started throwing packets of rice wrapped up in bamboo leaves into the river to feed the fish. These packets of rice later on became known as zong zi, glutinous rice dumpling.
♥ tabeshimashita by Chinese on 5th day of 5th lunar month
Thus on the 5th day of the 5th lunar month each year, there would be dragon boat races and people feasting on sticky rice dumpling. This year, the Dragon Boat Festival falls on 11th June.
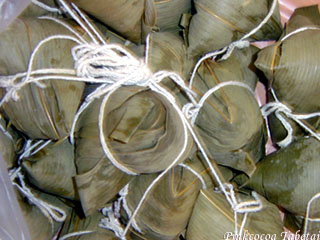
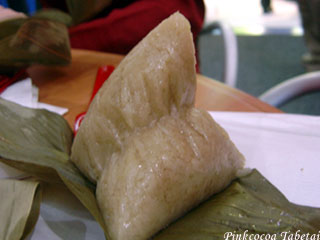
♥ A Bundle of Sticky Rice Dumpling
There are many different types of sticky rice dumplings. Though the sticky rice dumplings may look the same on the outside, each type tastes different, depending on the province you are from.
The sticky rice dumplings that I am showing here is from Central Taiwan, homemade in Sydney by my friend's mom. And this is how the sticky rice dumplings should look like, all tied up into a large bundle. Usually there would be more dumplings tied up into a huge bundle than that shown in the picture, say about 20-30 in one bundle.
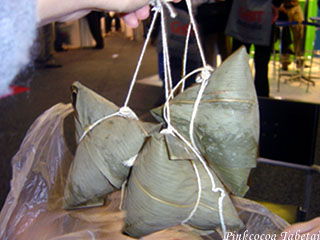
♥ Sticky sticky rice!
All you have to do is to take a scissor and cut off a string off one of the dumpling from the bundle. Unwrap the bamboo leaves and there you have it, a pyramid-shaped sticky rice sitting there, waiting to be devoured!
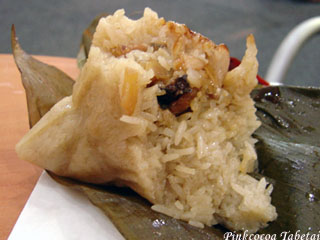
♥ A Big Bite of Sticky Rice Dumpling
These particular dumplings are savoury dumpling. The sticky rice is slightly flavoured with soy sauce. There are also sweet versions of sticky rice dumplings with red dates (red jujebe) or red beans as fillings, or even a plain sticky rice dumplings without any fillings that you enjoy by dipping into honey or rowing in sugar.
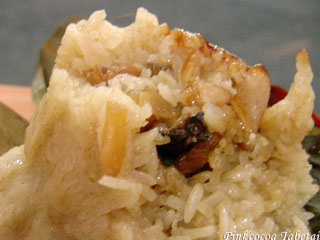
♥ Savoury Fillings
The usual savoury fillings include a piece of soy-braised pork belly, a yolk, chinese mushroom, dried shrimps and dried scallops. The Cantonese version also include a piece of chestnuts. There are also peanut sticky rice dumplings where some peanuts are mixed into sticky rice, or where the fillings include ground peanuts.
I am sorry about the bad quality of the photos here. I shall try and post up some better and clearer and more detailed pictures of the sticky rice dumpling later, perhaps after the festival.
You have one more day to go grab yourself a sticky rice dumpling and join Chinese all around the world in commemorating the great patriotic poet - Qu Yuan!
Continue Reading Row, row, row your boat
 ♥ I want Iced Coffee with my Cookies!
Mommy, I am all grown up now and I want iced coffee with my cookies and no milk please! (ps. iced chocolate do just as fine as long as it's not plain milk!) Oh and it has to be reduced fat too. No, thank you to full cream!
*blush* It's picky Pinkcocoa in action here. I was once an iced coffee addict and it was always always
skim iced coffee, please at the cafe. These days, I seem to have died down from my caffeine binge and once in a while I would have a craving for iced coffee.
♥ tabeshimashita @ pinkcocoa's kitchen on some time in May 2005
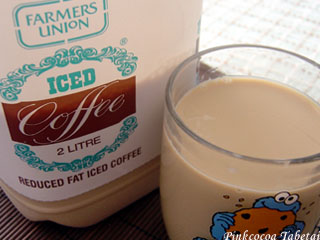
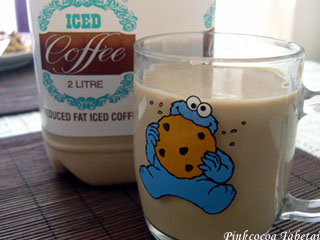
♥ Farmers Union Iced Coffee
And when I have an iced coffee craving, I would go to the supermarket and get myself a big 2 litre bottle of Farmers Union Iced Coffee. It is by far the best iced coffee I ever had in Australia. To me, it even beats the iced coffee served in cafe.
You couldn't really find Farmers Union Iced Coffee in Sydney about 6 to 7 years ago. It an South Australian brand. I would get any friends visting from Adelaide to bring me 2 to 3 2-litre bottles of iced coffee just because I have missed it for my morning caffeine fix so much. I was really picky and wouldn't get the supermarket iced coffee in Sydney even if my craving was really bad.
I haven't yet encountered any good iced coffee in Sydney yet. Maybe it's because I haven't been to places that serve great coffee. Then again, even at those places where they have great coffee, their iced coffee might not be as good. Perhaps I am just sceptical about the whole thing. I really hate it when they served iced coffee made of coffee syrup. Hated even more when they served iced mocha with coffee syrup and chocolate syrup!
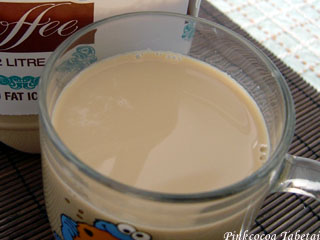
♥ Rich and Creamy Farmers Union Iced Coffee
So why is this particular iced coffee so addictive? For one very important reason, it is reduced fat. Of course it's not at all about the calories. To a food lover who needs to keep in shape, calories and fat content are equally important to taste. The taste of this iced coffee, let me assure you, is just right. Not too sweet, not too bitter and the texture not watery at all. It really does taste like iced coffee made with real coffee and milk. It's rather rich and creamy every mouthful yet it's light at the same time.
I know there are many that are put off by the overly sweet, syrupy flavour of supermarket iced coffee but do try this out when you have the chance. I think it might convert your opinion about supermarket iced coffee. ShinChan is one good example! He would never ever have touched supermarket iced coffee until I forced him to try Farmers Union Iced Coffee.And these days, his eyes light up whenever we have Farmers Union Iced Coffee in the fridge!
Continue Reading I want Iced Coffee with my Cookies!


